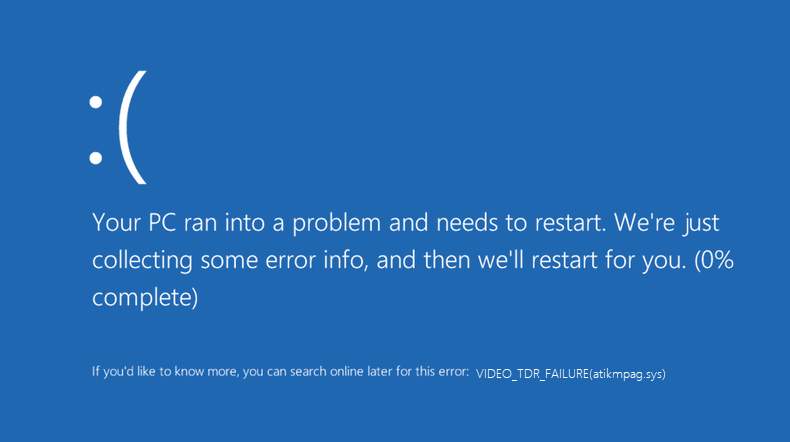
Stop code: VIDEO TDR FAILURE
If you’re here, you probably already know what this error is, and the chances are you’ve encountered it recently. The error may seem scary, and it can happen due to an array of reasons. The good news, however, is that the Video TDR failure issue is easy to fix.
Let’s look at some common reasons behind this issue, along with some effective troubleshooting steps to fix it.
What Is Video TDR Failure?
Table of Contents
Video TDR failure is a type of Blue Screen of Death (BSOD) error in which your system freezes and nothing but a blue screen appears. The screen says that your PC has run into a problem and needs to restart. At the bottom of the page, you see the Stop code as VIDEO TDR FAILURE.
TDR stands for Timeout, Detection, and Recovery. This error occurs when your graphics card doesn’t respond. When your system can’t communicate with the graphics card, TDR failure happens.
Some reasons for this issue are:
- Problem with the graphics card or other components
- Outdated graphics card driver
- Compatibility issues
- Overclocked elements
- System overheating
- Conflicting applications
- Too many apps running simultaneously
Please note that while these problems are the major cause of the TDR failure error, other undetected issues may also be there.
How to Fix Video TDR Failure on Windows 10?
Now that we have discussed what video TDR failure is and the problems causing it, let’s delve into some steps to fix it. Here are some troubleshooting steps you can follow. You can perform them in any order, though following the same order as provided will be more helpful.
Update Graphics Drivers
The easiest fix for this issue is to update your graphics drivers. Follow these steps.
Open the Run box on your PC by pressing Win + R. In the Run dialogue box, type the following command:
devmgmt.msc
Press OK. A list of drivers will appear. Look for Display adapters. Click on the arrow beside the icon of Display adapters and then click on “Update driver.” If you want to reinstall the driver, click on “Uninstall device.”
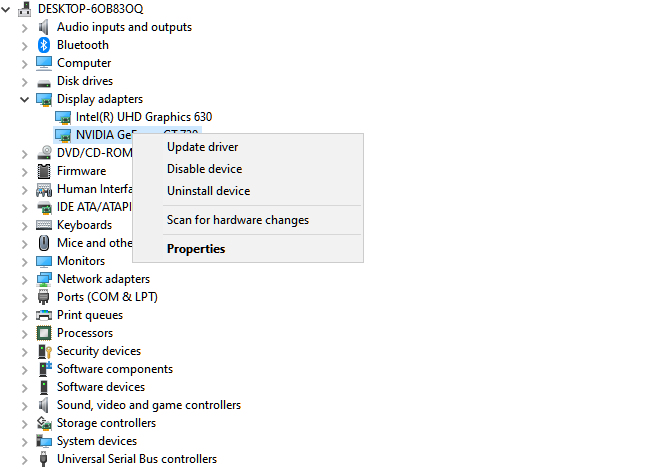
We recommend reinstalling the driver completely instead of updating it. By uninstalling the driver, you delete all the problematic files associated with it. Now, visit your graphics card company’s website and download the latest driver.
Reduce Overheating by Cleaning Your Components
Overheating can cause various issues. Some users face an issue where their device goes to sleep during a task. Other users may experience lag or freezing. Video TDR failure is another common issue associated with overheating of the components.
You must clean your computer’s parts regularly. Prolonged residue building can affect your system’s performance and lead to frequent overheating episodes. However, be careful when cleaning your equipment physically. If you’ve never cleaned computer components before, check some tutorials on YouTube.
Fix Issues Related to Graphics Cards
Sometimes, your graphics card may cause an issue. The steps to resolve this issue will depend on the graphics card you use. Three renowned graphics card providers are there:
- AMD
- NVIDIA
- Intel
The process is different for each graphics card provider.
For AMD cards, you need to relocate atikmpag.sys and reinstall the driver using the same steps used to reinstall the video driver. After reinstalling, search for the atikmdag.sy or atikmpag.sy file in your C Drive and move it to the desktop. Now, open the command prompt as an administrator and execute the following command:
expand.exe atikmdag.sy_ atikmdag.sys
A new copy of the file will be created on the desktop. Move that file to the initial file location in the C Drive.
The process is simpler for NVIDIA and Intel graphics drivers. All you need to do is find the respective drivers and reinstall them. For NVIDIA, locate the following file: nvlddmkm.sys. For Intel, find the file: igdkmg64.sys. Once you find them, uninstall them and install the latest versions from the official website of the provider.
Run CHKDSK
If none of the above steps work, run the CHKDSK command and see if it creates a difference. Running CHKDSK is a common solution for BSOD issues.
To run CHKDSK, press Win + X and open Command Prompt (Admin). In the command prompt box, execute the following command:
chkdsk/ f /r C:
Here, C stands for C Drive. If you want to select any other drive, you can replace that with C. After executing the command, type Y and then press Enter again. Now, restart your system.
Performing these steps will repair all the basic disk issues.
Check the Dump File
If the above steps don’t work, analyze the dump file. It can help you determine the underlying cause behind the TDR video failure issue. Follow these steps to analyze the dump file.
Open the Run box and run the following command:
sysdm.cpl
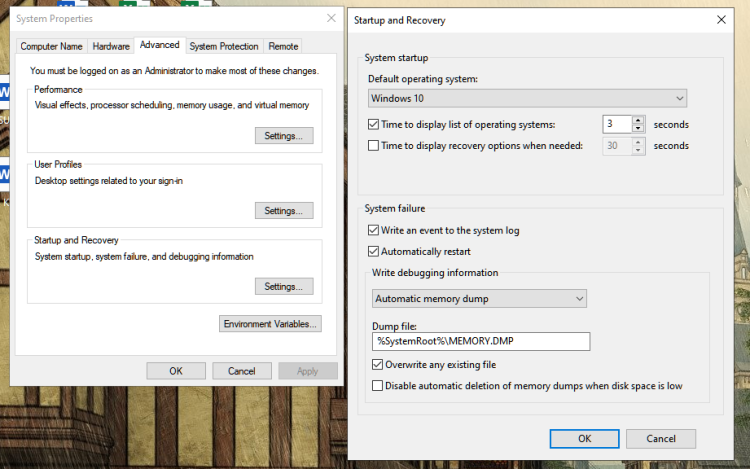
Click on Advanced and then on Startup and Recovery. Now, click on Settings. Click on Write Debugging Information. Choose Small Memory Dump (256 kb) and press OK. Last, locate the dump file in C:\Windows\Minidump.
Change Your Power Management Settings
The final step is to change your power settings. You can also perform this step first and then proceed with other steps. This step alone won’t fix the issue, but it can prevent it from happening again in the future.
To access the power management settings, open the Run box and run the following command:
powercfg.cpl
A power settings window will appear. Select High Performance and then on Advanced Power Settings. Search for PCI Express and go to Link State Power Management. By default, the options will be set to On Battery and Plugged In. Set both the options to “Off” and save the settings. Finally, restart your PC.
Wrap Up: Video TDR Failure
Video TDR failure can occur due to many reasons, and thus, there’s no single step to fix the issue. Perform all the steps discussed above, hoping one of them will work. If none of these steps work, resetting your system and reinstalling Windows may help. You could even switch to MacBook, as it has fewer issues.
So, which step worked for you?